View and manage tasks
Quickly locate tasks to access associated records, manage assigned users and workgroups, and update the task status.
Prerequisites
All users can create tasks, regardless of their permissions. However, after a task has been created, only the user or workgroup assigned to the task, or any user with Administer Tasks permission, can edit task details, add and edit associated records, and complete or reopen the task.
Locate your tasks
You can view your assigned tasks from:
-
Home: The Tasks Assigned to Me grid displays your tasks.
-
Left-side navigation: From the left-side navigation, select Tasks.
-
Workgroup and parcel records: Tasks associated with a workgroup or parcel can also be viewed within that workgroup or parcel record.
You can also use task search to locate tasks assigned to any user or workgroup. Learn more: Search for tasks
View task details in the task Overview
The task Overview displays all associated records and assigned users.
To view or edit a task, select the Task ID link.
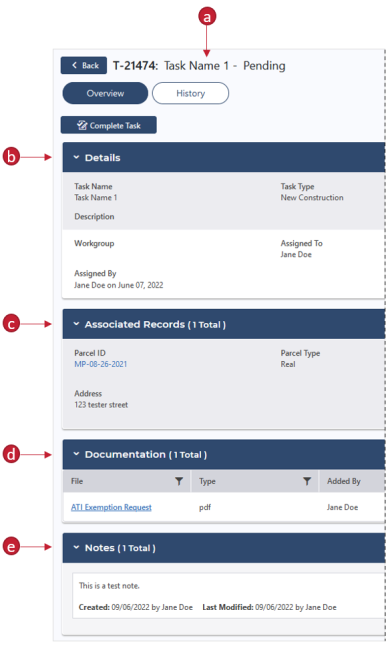
The following image and legend describe the information available in the task Overview.
-
Task ID, name, and status: The ID, name, and status of the task.
-
Details: The Task Name, Task Type, Status, Description, associated Workgroup, the assigned user, the Due Date, and the user who assigned the task.
-
Associated Records: Associated parcel and assessment records.
-
Documentation: Documents uploaded or scanned to the task.
-
Notes: Notes added to the task.
Edit task details
You can change a task's type, update its status, or assign a user or workgroup at any time.
-
Go to the appropriate task.
-
On the Details panel, select Edit.
-
Adjust information as needed.
-
Select Save.
The adjusted information will be reflected in the task's Details panel. If you assigned a user, the task will appear on their Tasks Assigned to Me grid. If you assigned a workgroup, the task will appear on the workgroup's Tasks panel.
Add or remove associated records
Add a record
-
Go to the appropriate task.
-
On the Associated Records panel, select Edit.
-
Select Add Record.
A new line appears in the grid.
- Populate the fields.
-
Record Type: Select the type of record to associate, either Parcel or Appraisal.
-
Record ID: Enter the record's ID number.
Note: As you enter the Record ID, a list will automatically populate.
-
Select Save.
The associated record and details display in the task's Associated Records panel.
![]()
The task also displays in the associated parcel or appraisal's Overview.
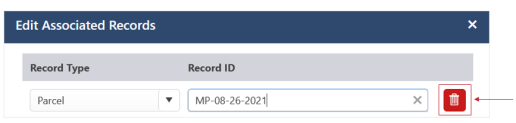
Remove an associated record
-
Go to the appropriate task.
-
On the Associated Records panel, select Edit.
-
Locate the record to remove.
-
Select the Delete icon.
-
Select Save.
The record no longer appears in the Associated Records panel.
Add or remove documentation
You can scan or upload any documentation to a task, such as a copy of a driver's license or record of a name change.
Scan documentation
All users can upload documentation to any task, even if they aren't assigned to the task.
-
Go to the appropriate task.
-
On the Documentation panel, select Scan.
Note: When using the Scan feature for the first time, you are prompted to download and install a program to connect to your scanner. Follow the first-time setup instructions for assistance.
-
Expand the Scan panel.
-
For Select Source, choose the scanner to use.
If using a physical scanner, select Duplex or Auto Feeder, or select Advanced Options to set more options.
- For Pixel Type, select whether to scan in Color, B&W (black and white), or Gray (grayscale).
- Load the document in the scanner, and then select New Scan.
Now, you may Scan additional pages, Re-scan a document, Adjust a document, or .
Add documentation
All users can upload documentation to any task, even if they aren't assigned to the task.
-
Go to the appropriate task.
-
On the Documentation panel, select Add.
-
Select the Select Files button to browse for a file or drag and drop a file in the box.
-
After choosing the file, select Add Documentation.
The uploaded document appears in the Documentation panel grid. To view it, select the File link.
Remove documentation
-
Go to the appropriate task.
-
In the Documentation panel, locate the document to remove.
-
Select the Delete icon.

-
On the confirmation message, select Yes.
Add, edit, and remove notes
You can use notes to keep up with information or leave comments for the task's assigned user. For example, you can alert the assigned user that a customer will return to your office tomorrow to provide required ID.
Add a note
All users can add a note, even if they aren't assigned to the task.
-
Go to the appropriate task.
-
On the Notes panel, select Add.
-
For Note, enter a note, up to 1,000 characters.
-
Select Create Note.
The note displays in the Notes panel.
Edit a note
-
In the Notes panel, locate the note to edit.
-
Select Edit.
-
Adjust the note as needed.
-
Select Save.
The new information is reflected in the Notes panel.
Delete a note
-
In the Notes panel, locate the note to delete.
-
Select the Delete icon.
-
On the confirmation message, select Yes.
The note no longer displays in the Notes panel.